30 September 2015

Lego Digger Birthday Cake

My son is seriously into his Lego and loves everything about it! What is not too love when everything is AWESOME right!!! Sorry I just couldn't help myself there....

We went to Legoland Florida last year and the boys enjoyed it even more than the Disney parks. Go figure. Probably because Everything is Awesome......everything is cool when you're part of a team! Right. Now let's fast forward to this year and time for my son's birthday. 

Guess what he wanted? A Lego Cake! But it had to be totally build able and eatable. We decided on a Lego Construction vehicle, a digger. I mommyfied it a bit.

How to make an Lego Digger Cake from edible Lego blocks


How to make edible Lego Blocks


I first made a silicone mold of the Lego Blocks that I will need. Easy right! 
We had plenty of blocks to use for the mould. 

Once your mould is set you can use it. Prepare your fondant or sugarpaste. I coloured mine yellow and added tylose powder for stability. 

You might want to dust your moulds lightly with some cornflour to prevent the fondant from sticking.
Then press a ball of yellow fondant into your mould and shape. Take it out and put aside to dry.

Once you have all your blocks done and they have dried nicely you can start your building!

Lego Digger Cake

I baked two round chocolate cakes which I decorated with chocolate icing (frosting). Then it was time to create our Lego Digger. My son helped out alot here because mommy's lego building skills are not great!

We first made some wheels and other parts including the scoop/digger and let them dry. Then we started with the wheels and bottom parts, and build it up just like you would lego. We used edible glue where needed. I made two little Lego men too.

Once the Lego Digger was build I decorated the rest of the cake to look like a digging/construction site. I used loads of chocolate and chocolate balls and just had fun. The Lego men took their place and everything was Awesome! Hahaha....

Here is the end result, prettty cool right. It also tasted great. 


If you enjoyed this post please follow us on Make.Eat.Love

09 June 2015

How to DIY a flower lamp for baby nursery - DIY baby nursery lamp makeover

I am sure you have seen the beautiful flower lampshades that are adorning baby nurseries all over. Pinterest and Etsy are full of them and every high end baby nursery has one. 


The beauty of them however is that you do not have to fork out big money to buy one for your little princess. You can make your own! It really is not difficult, just a bit time consuming, but the end result is something that will WOW everyone and it is such a pretty addition to your baby's nursery. 

I am busy decorating my little princess' nursery at the moment and decided to make her one of these gorgeous shabby chic flower lampshades. It came out better than expected! I love it and it is such a focal point in her room and gives out a soft glow...perfect for midnight diaper changes. 


What do you need?

1. An old lampshade/lamp
2. Glue gun and glue sticks
3. Organza fabric in the colour of your choice (I chose pink)
4. Beads (I used pearl colour and light pink)
5. Candle and some prongs/pinchers

To start you need to make sure the lampshade you are going to use is nice and clean and free of dust. I had an old lamp from my son's nursery that I used. 


You then need to start making some flowers for your lamp. You need ALOT of flowers and it can be time consuming. It took me about 3 evenings to make enough flowers to cover my lampshade. I find it easier to break it up into 3 evenings and not to sit and do it all at once! It took some patience as I wanted it to be done NOW! 

To make the flowers you need a flower template or you can just cut circular shapes out of the fabric which I did. I started of with the template but then later just make circles which worked just the same. The size of the circles depends on how big you want the flowers to be. I made mine about 5 cm (2 inches) and some smaller ones too. 


Once you have your flowers or circles cut you have to hold each one over your burning candle with your thongs (it gets very hot!) Do not put your fabric into the flame, it will burn black! Just hold it over the flame so the heat melts the ends of the circle and it starts curling up. You will see and you can then judge how much you want it to curl and shrink! This is your flower petals. 


Once you have all your flower petals it is time to assemble your flowers. You take one or two of the bigger petals for the bottom and some smaller ones for the top. Rearrange them so that they look good for you and look like a shabby chic flower. You can now stick the petals together with your glue gun, just a drop of glue between the layers. Be careful the glue is hot!!! I have burned myself a few times glueing these together. Once the flower is done you can glue your bead into the middle.

Now the fun starts. Glue all the flowers you just make onto your lampshade. Glue them close together so that you cannot see through them. I finished my lampshade off with a nice ribbon at the top and bottom and I glued a piece of lace onto the bottom of the base too, just beacause I liked the look of lace on wood.


Be creative wit your flowers and lamp and have fun!

Here is the final piece, isn't it just gorgeous! 


If you like this and other projects like this please follow my Facebook page. 


26 February 2014

Quick and Easy Savory Muffins

Are you looking for a quick and easy recipe for savory muffins? Look no further. 

I wanted to knock up some nice savory muffins a few mornings ago for breakfast and I wanted it to be quick and easy. No more than 30 minutes from start to finish. 
I did what anyone would do...Google, but sadly there was nothing I liked, so I decided to make up my own recipe! This was the results and they were delicious! 


Here is my recipe:

Ingredients:

  • 2 cups (500g) self-raising flour
  • 1 cup (250g) grated cheddar cheese (or any tasty hard cheese)
  • 1 packet of smoked bacon cut in cubes
  • 150g butter, melted
  • 1 cup (250ml) milk
  • 1 egg, lightly beaten
  • Fresh herbs (I used fresh rosemary from my garden - finely cut )
  • Salt and pepper to taste

Method:

Preheat the oven to 180°C. Line a 12 cup muffin tray with muffin sized papers. 
Mix the self-raising flour, salt, cheese, bacon, herbs together. In a jug combine the egg, milk and 
butter.
Pour the wet ingredients into the dry ingredients and mix until just combined.
Pour into prepared muffin pan and bake for 15-20 minutes.

Delicious!

If you enjoyed this recipe please join our Facebook page for more Make.Eat.Love

Quick and Easy Savory Muffins


20 February 2014

What is Pink Ostrich?

My blog is three years old! Well three and a bit and the time has come to let this baby grow up! I started out as Wyni's Kitchen and brought you all the recipes I have tried and loved, some my own some passed down to me. I shared my cakes and how I made it as well as handy tricks and tips. 

Three years down the line and I still love my kitchen and spending time in it. I also like sharing it with you! My blog has changed a bit now and includes more of what I do, not just recipes and cakes, but my other passion too....

My dream has always been to create, to make beautiful things with my hands and share them with all of you! This is the start of my dream..

I started Pink Ostrich because I have always had a big passion for designing and creating beautiful things with my hands. I can even say it is in my blood! My great-great grandmother was a great wedding cake designer, my paternal grandmother owned her own bakery and my grandmother designed the most beautiful clothes and wedding dresses! 
I knew I had a creative talent, but I kept it hidden for fear of failure! How many of us do that? We are so scared to take a chance on something or to start a new venture because we are scared we will fail. Failure is inevitable sometimes, but if you don't try you will never know what it is to succeed!

“Failure is the condiment that gives success its flavor.” Truman Capote

That is why I am taking my lamp out from under my bucket and I am letting my little light shine! I am no longer hiding my talent. I am born to design, born to create... It's in my blood! It's in me!


Do what you love, love what you do!

My love for making unique baby mobiles and nursery décor came with the birth of my second baby 
almost two years ago. I searched and searched for something unique and handmade to hang over his crib and to tie the whole theme together. I could not find anything I liked and decided to give it a go myself. I was hooked! Before I knew it I was designing and making baby mobiles and nursery décor for friends and family. I loved it, they loved it. I hope you will too.


Join us on Facebook
Pink Ostrich


Every piece I make is made with love and care. I hope you will enjoyed it as much as I enjoy making it.

"Nor do people light a lamp and put it under a basket, but on a stand, and it gives light to all in the house. In the same way, let your light shine before others, so that they may see your good works and give glory to your Father who is in heaven. Matthew 5:15-16"

17 October 2013

How to dry fondant quickly!

It is a problem we all have some or other time when working with fondant. You have a last minute cake or you live in a place with high humidity or you just can't seem to get your fondant figurines to dry quick enough. What do you do? How do you dry your fondant figurines quickly?

Well search no more, here is my tips.

Follow us on Facebook MakeEatLove

Five ways how to dry fondant quickly


1. Mix some CMC Powder with your store bought or homemade fondant. I usually do not mix the CMC Powder into the whole batch of fondant because it can dry very fast and leave you with dry, crumbly fondant. I dip the piece of fondant that I am working with into a bit of CMC Powder and mix it through well. The more CMC you use the harder it will be. I suggest using only a tiny bit.
There are many different brands out there!


2. I use a hairdryer! Yes I know it sounds crazy but it really works. Put the hair dryer on the lowest heat setting. Hold it about 12 inches (30cm) away from the figurine that you are drying and moving the hair dryer side to side over the figure. I do it for 3 minutes and then let it rest for 3 minutes, I do it about 3 times and it will dry nicely! You can repeat if needed. There are many different brands out there!


3. You can mix some Tylose Powder with your store bought or homemade fondant. I basically use it the same way as I would use the CMC Powder. I don't really see much of a difference.
I usually do not mix the Tylose Powder into the whole batch of fondant because it can dry very fast and leave you with dry, crumbly fondant. I dip the piece of fondant that I am working with into a bit of Tylose Powder and mix it through well. The more Tylose you use the harder it will be. I suggest using only a tiny bit.


4. You can put your fondant figurine in the oven to dry it faster. Yes the oven, but please do not put the heat on! You only need the oven light on. You can put it in the oven with only the oven light on overnight. I have also heard that if you have a convectional oven you can put it in the oven with only the fan on. I have not tried this method so I am not sure if it does work!


5. Use an old fashioned reading lamp to quickly dry your fondant. Put the light on and place figurines under the lamp. The light will dry it out.


Honestly if you are desperate you would try them all together, but one or two of these methods will usually do the trick. I almost always use CMC or Tylose Powder and then on of the other methods.

These methods work very well when you have to deal with high humidity!

Follow us on Facebook www.fb.com/MakeEatLove

22 July 2013

How to make Slugterra's Eli Shane from Fondant and How to make Slugterra Slugs from Fondant

It was my son's 9th Birthday on Saturday and I could not resist giving you all a sneak peek of the Fondant Eli Shane figurine and the Fondant Slugterra Slugs Burpy, Joules and Doc that I made for his cake.

Making figurines and fondant details for cakes are my favourite part of cake making that is why I decided to share them first. I will share the whole Slugterra Cake with Fondant Eli Shane and Slugs with you in my next post...but beware the cake has a twist (my son has a wonderful imagination). Keep checking back.

You can also join our Facebook page to make sure you keep updated with all our creations and yummy bakes. Make.Eat.Love


I believe this is the first totally edible Eli Shane that you will find on the Internet. Unfortunately I did not take photos as I was making him, so there is no step for step photo tutorial on how to make a fondant Eli Shane and his slugs, but I will explain how I made them. I hope it will help some mommy or cake decorator out there and give you some inspiration and ideas.

Here they are---->
What do you think of them?
My son and his friends all loved them and could not tell some of them apart from the real toys @mymissionaccomplished


How to make Eli Shane from Slugterra and his slugs

HOW TO MAKE ELI SHANE OUT OF FONDANT

You will need:

  • Fondant or sugar paste in the following colours: Flesh tone, black, light blue, grey, white and orange. You can buy pre coloured fondant or colour your own. If you are using fondant, I usually add some CMC powder in the fondant to make it dry harder.
  • Fondant Tools
  • Lollipop sticks
  • Edible glue
  • Edible markers

How to make Eli Shane from Fondant:

Form his head out of skin tone fondant. I modelled his head around a lollipop stick. The lollipop stick helps for structure and to anchor him onto the cake.
Make hollows for his eyes with your tools and form a nose. Now make his eyes with the light blue fondant and some white. Stick to head with edible glue.

TIP: Keep a picture of Eli Shane handy that you can use as a guide.

I made a slit for his mouth opening and added some teeth (white fondant).
Add some eye brows in black.

Let the head dry. This does not take long if you use sugar paste or fondant with CMC or Tylose powder in it. I would say leave it about 30 minutes.

Then you can add some hair. I made my hair black. Stick with edible glue.

You can now add some detail to the eyes and around they eyes with edible markers. Look at your picture reference and see what you want to do.

I then formed his shirt out of black fondant and added all the details in grey and orange. I made his Slug Slinger with light blue, black and orange star. I stuck it to his body with edible glue.
Make his black sleeves and add some arms from flesh tone fondant. Let dry.
Attach arms to body with edible glue. You can put a toothpick in if you feel your arms need more support. Please remember to tell the people who will eat the cake that you did that!
Add some details on shoulders.

For his legs I mixed some blue, grey and black fondant to make denim colour. I think I could have made it even more blue, but I liked it darker. I put the legs in a crouching position and let it dry like that. Once dry I added some shoes. I know Eli Shane wears boots, but honestly I thought the shoes looked better for the position he was in. The boots made him look like he had no legs at all!

Once the legs and shoes were dry I attached his bottom half to the top half. I kept the lollipop stick a bit longer so it can stick into the cake for support and to keep him up.

To finish him off I made his blaster. I could have made it bigger...Maybe next time!

And that is  How you make Eli Shane from fondant!


HOW TO MAKE SLUGTERRA SLUGS FROM FONDANT


How to make Burpy of Slugterra from Fondant:

How to make a Slugterra slug - Burpy


You will need:

  • Fondant in the following colours: orange, yellow, red, white and black.
  • Edible  glue
  • Edible markers
Form a slug from orange fondant. Add eyes in red and white fondant. Black pupil is drawn on with edible black marker. Add yellow details and stick with edible glue. Add mouth in black and white teeth. Make his little "feelers" in advance and let dry, once dry stick to head with edible glue.
TIP: Use a toy or picture as guidance.


How to make Joules of Slugterra from Fondant:


How to make a Slugterra Slug - Joules
You will need:

  • Fondant in the following colours: dark blue, light blue, red, pink, white and black.
  • Edible  glue
  • Edible markers
Form body for Burpy out of the dark blue fondant. Add light blue detail. Stick with edible glue. Add mouth in black and white teeth, add pink for tongue. Make eyes with red and white and add a black dot for pupil with our black edible marker. Make little "feelers" in advance and let dry. Once dry stick to head with edible glue. I did not add the yellow to him,  I liked him just like that and did not want an exact copy of the toys!


How to make Doc of Slugterra from Fondant:


How to make a Slugterra Slug - Doc


You will need:

  • Fondant in the following colours: dark green, light green and white.
  • Edible  glue
  • Edible markers
Form body for Doc out of the dark green fondant. Add light green detail. Stick with edible glue. Add mouth in white. Make little "feelers" in advance and let dry. Once dry stick to head with edible glue. Make a white eye, stick to head and add dark green eyelid. I made his pupil with black edible marker.


 There you go, I hope  you have  as much fun looking at these or making them as I did.


How to make a Slugterra Cake and Decorations

Join our Facebook page for this and more creations www.fb.com/MakeEatLove


20 June 2013

Monster Smash Cake - First Birthday

I shared my Baby Boy's First Monster Birthday Cake with you so I thought I would show you how his Monster Smash Cake looked like.


It was plain Vanilla Cake. The recipe is all over my blog. I covered it with blue vanilla Buttercream icing. I did not bother to make it extra healthy because it is a smash cake after all and he hardly got any in his mouth! He was actually pretty good with it :) I would have liked to see a lot more MESS!!


Here is my Little Monster with his Monster Smash Cake! Isn't he just THE cutest!!


First Birthday Book Cake - Monster Cake

I wanted to share with you the cute Monster Cake I made for my baby boy's First Birthday! I decided on a Monster Theme for his First Birthday Party and had to come up with a cake that fits into the Monster theme, but also something that suits him and his personality.

I just love my baby boy he is such an adorable little Monster. The cute fluffy kind of course! He is such a bundle of energy and it is hard to keep up with him sometimes, but when he keeps still for a few minutes he loves his cuddles and hugs. He is just a loving, happy, laughing bundle of joy!
He loves books and he is very intelligent. Keeping all of this in mind, I came up with a great idea for his cake.


I decided to make an Open Book Monster Cake but with a little story in it. The story of his First Birthday. The story is about a little Monster's First Birthday and this little cheeky Monster who tried to steel the Birthday cake! Well there is more, there is another little Monster hiding inside the cake and he is also trying to get his hands on the cake!
I also added some other fun little elements. I made his name into six different little Monsters, a different Monster for each letter. All the kids at the party loved that!


I also added an extra surprise to the cake...

Once the cake was cut everyone saw the surprise...pictures inside the cake. Every slice had the same pictures. I just loved adding pictures inside my cake. I learned How to add pictures inside my cakes from a tutorial I bought. I added stars and half moons!


I loved making his cake because it was totally mine. My design, my ideas and my creativity. I did not have to search the net for hours for ideas, I  did not have to make something that has been made a million times before, I just used all the ideas I had in my head and made it my own. My baby loved his cake and so did everyone at his party. What a special, precious day it was!


It was a Happy First Birthday with my little Monster!


08 April 2013

Under the Sea or Little Mermaid Cake

As promised here is my Under the Sea cake with fondant Mermaid cake topper. I made this cake for a little girl who turned 5 and although the cake was a challenge in the February heat I think it came out really well.


Unfortunately I did not take photos with every step that I did, but I will try and tell you how I made all the different fondant/sugarpaste figurines on the cake. It was alot of fun to make the Mermaid and all the little sea creatures. I made a turtle, octopus, fish, coral, sea anemone, shells, starfish, sea sponges, seaweed and more.


Little Mermaid cake topper


How to make a fondant or sugarpaste Mermaid Cake Topper

You will need:


Fondant or sugarpaste
Gel colours in flesh, brown, green, black or  pre-coloured fondant
Edible spray (green)
Lollipop sticks
Edible glue
Tools


I used sugarpaste just because it dries harder than fondant and we have very high humidity here. I also wanted it to be hard because it was so big and the main part of the cake. You can use fondant and add a bit of tylose powder or CMC powder to it to make it dry harder.

Form the body for the Mermaid first from the flesh coloured fondant. Put a lollipop stick inside the body so that only a small part comes out both ends, to attach head and tail. Make some arms. Attach to body with edible glue.

Make the Mermaid's head, form eyes and nose and attach head to the body with edible glue. Make sure you stick the top of the lollipop stick inside her head. Leave to dry.

Take a piece of white fondant to form the tail. I used the back of a piping tip to make the scales. I also made a small hole in the bottom where I attached the fin. Use a lollipop stick for it.

Once the tail is dry spray it with edible spray.

Cut a fin out of green fondant for the bottom of the tail. Let dry in the position that you want it to be. Once dry attach it to the Mermaid with edible glue. I left this part till I placed it on the cake!

Roll two balls from the green fondant for her top. I used the scallop tool to imprint on these balls. Stick to Mermaid with edible glue before they are dry. I made a little seastar from the green to put on her head.

Roll the brown fondant out into long thin strips an attach to Mermaid's head, you can make the hair as long or short as you want.

Little Mermaid made from fondant


How to make a fondant Sea Turtle


Fondant Sea turtle

You will need:

Sugarpaste or fondant
Gel colours in brown, green or precoloured fondant
Circular mold for shell
Tools
Edible glue


I used a silicone chocolate mould for the shell. Take a piece of brown fondant and place in mould. Remove when dry. Form head, arms and flippers from green fondant. Let dry and then attach to shell.

How to make a Fondant Octopus

Fondant Octopus

You will need:

Sugarpaste or fondant
Gel colours in purple and black or precoloured fondant
Tools
Edible glue


Make a ball for head, add eyes and form mouth with tool. To make the tentacles roll fondant into thin strips and twist. Add details. Attach to body with edible glue.


How to make fondant seaweed, seasponge, starfish and sea anemones


You will need:

Sugarpaste or fondant
Gel colours in any colour you want or precoloured fondant
Tools
Edible glue

For the sea anemone I used orange fondant and rolled it into thin strips. Put a little hole on the top and attach a few together. I added sugar pearls on the top for extra "bling".

To make the starfish I used a star cutter and cut one "leg" off and formed the rest with my hands to look more natural. I used the a piping tip to make the pattern on the starfish.

To make the seasponge roll out a piece of fondant and cut into squares. I made random hole in it with the back of a piping tip.

To make the seaweed I took green fondant and cut it into small strips. I then cut a point at the top of the strip and curled it a bit so it looks more realistic and then dried it.


Fondant seashells and seaweed


How to make fondant Seashells


Fondant sea urchins


You will need:
 
Sugarpaste or fondant
Gel colours in any colour you prefer or precoloured fondant
Tools
Moulds
Edible glue

I made the sea urchins and the seashells with moulds that I made. I made my own moulds with a special mould material and real seashells and sea urchins that I picked up from the beach.
When you make your moulds you must make sure the seashells and urchin shells have been thoroughly cleaned and washed.

I might do a post on how to make your own mould sometime. Let me know if you are interested in a tutorial and I will do one. Leave me a comment.

That is how I made my cake and all the fondant/sugarpaste figurines. Easy...right

Happy creating!

Little Mermaid Cake


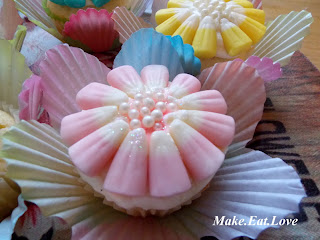
How to make pretty Flower Cupcakes using Candy Corn

I made these pretty flower cupcakes for Easter and I got alot of interest in them. Everyone wanted to know how I got the effect with the petals...well it was pretty easy to do and it did not take long at all.


The big secret...I used Candy Corn for the flower petals!
Now if you are not in the USA then you might not know Candy Corn, but it is a very popular American candy. I got mine send over from the USA. You can get the normal Candy Corn (white, orange and yellow) that is so popular during Halloween, but I used the Easter edition because I just loved the pastel colours.

Here are the two different types. There might be more, but I only know about these. See how pretty the Easter Corn are!


I started off baking some Vanilla Cupcakes.
 

Vanilla Cupcakes

1 cup (250g) white Sugar
1/2 cup (115g)softened Butter
2 Eggs
2 tbsp Vanilla Extract
1 1/2 (375g) cups Self Raising Flour
1/2 cup (250ml) Milk

Cream the Butter and Sugar together till light and fluffy. Beat in the Eggs and stir in the Vanilla. Add the Flour to the mixture and mix well. Stir in Milk and beat till smooth.
 
Prepare muffin tin with cupcake liners and pour mixture evenly into cupcake liners.

Bake for 20-25 mins at 180 degrees CELCIUS.
 

Decorate your cupcakes to look like flowers

Once your cupcakes are completely cooled down, decorate with a swirl of vanilla buttercream.
 
Now comes the fun part. Take your Candy Corn and place onto the buttercream frosting with the white part facing the middle. The coloured part should face out. Just repeat it all around till it makes a flower. You can make different colour petals or just one colour - be as creative as you like!
 
The middle of the flower I decorated with some edible glitter and some coloured sugar pearls or dragees.


There you go, a perfect pretty flower for any occassion!

Enjoy and Happy Spring to the other side of the world ;)