30 May 2011

80's Theme Birthday Cake

A friend of mine recently had a 80's inspired Birthday Party and I offered to bake her a cake for the occassion. Thinking of the 80's, who can still remember Pac Man, the Rubbiks Cube, AirWolf, A-Team and Who's the Boss? And don't forget all the music that made the 80's what it was, Cindi Lauper, Men at Work, Prince, Michael Jackson, Madonna, AHA, The Cure, Depeche Mode and Queen just to name a few.

I wanted to bake a cake for her that  incorporated all the things we liked about the 80's and this is what I came up with...


I made a hip teenager that is chilling on her bed with a Vogue and her favourite Music Tapes and Walkman at hand (and her Rubbiks Cube of course!) Everything but the doll is edible.


80's INSPIRED BIRTHDAY CAKE


Vanilla Sponge Cake

2 1/2 cups (625ml) Self Raising Flour
2 cups (500ml) Sugar
4 large Eggs
1 cup (250ml) Milk
1/4 cup (65ml) Vegetable Oil
1 tsp (5ml) Vanilla Essence

Preheat the oven to 180 degrees celcius.
Mix the eggs and sugar together till thick.
Add the flour, milk, oil and vanilla
Beat till smooth and creamy

I used a square cake tin 20cm x 20cm for the bed

Bake for 30-40 mins. It is done when a test pin comes out clean.

LET THE CAKE COOL COMPLETELY

Decorate

500g Butter Icing
250g Royal Icing
Edible Glue
1 kg Ready to Roll Fondant - white
Ball of Sugar Paste - about the size of your fist
Gel Colours - Blue, Red, Yellow, Green, Black
Edible Food Markers - Red, Blue and Black
Chocolate sticks (Sticko) or round wavers

The day before

Colour a small piece of the Sugar Paste light yellow and make some flowers out of the sugar paste and let them dry,also colour a small piece of Sugar Paste bright yellow and cut out a circle (for PacMan) and lettering for Happy Birthday.

Colour a small piece of sugar paste red, orange, blue, yellow, green, black and grey. Cut into small blocks for your Rubbiks cube. Use black fondant to make some Tapes. Grey for Walkman and airphones and blue for magazine cover. Write in your magazine with edible markers, also make stickers for your tapes and write on it with edible marker. If you need to fill in the spaces of the Rubbiks Cube use a black edible marker.


Fondant Tapes
Fondant Walkman

Fondant Rubbiks Cube
Fondant Magazine


On the day

Bake the cake.

Colour most of the Ready to roll Fondant purple (blue mixed with a little red), the remaining piece I coloured light yellow.

Bed
To make the bed, I cut off a 5cm (2 inch) piece of cake from the side of the Sponge Cake. This I used for the pillows.
I then covered the whole cake with Butter Icing.
Next I rolled out the purple fondant to fit the size of the cake. Carefully place the fondant over the cake, smooting it as you go to get rid of any air bubbles. Only smooth the fondant out over the top of the bed, let it fall naturally towards the bottom - this creates the effect of a duvet.
I cut the piece of cake I took from the top into two equal pieces and cover them with purple fondant. This is your pillows. I used a crimper tool to do the edges of the pillow and to seal the fondant.

Headboard
Then take your chocolate sticks or wafers and attatch them to the top of the bed with some royal icing. This is your headboard. Once the headboard is dry you can pop the pillows onto the bed.

Fondant Doll's clothes
The top and pants for the doll is made from sugar paste that is coloured bright yellow. Cut two flower shapes out of the sugar paste that is big enough to cover her breasts. Attach to the doll with edible glue and another piece of white sugar paste on her back for the strap. Make a hot pants out of the rest of the bright yellow sugar paste and attach with some edible glue.

Once the doll's clothers is completely dry, you can position her on the bed. You might want to stick her to the bed with some royal icing - just to make sure she does not move around.

Fondant Blanket/Throw
Use the rest of the purple fondant to make her a little blanket that she can throw over her legs. Crimp the edges with the crimping tool. Stick some of the flowers you made all over the throw and on the pillows (use edible glue).

Fondant Frill
Use the light yellow piece of fondant that you kept asside. Emboss with a nice patern. Attach to the end of the duvet - as a pretty frill. Attach with edible glue.

Now all you need to do is add the accessories - Walkman, Tapes, Rubbiks cube and Vogue and the PacMan and Birthday lettering and voila!


80's Theme Birthday Cake


Be creative and have fun!


Homemade Soft Pretzels without yeast

While living in America I fell in love with Soft Pretzels. Fall time in New York City, the wonderful smell of freshly baked pretzels and roasted nuts hung think in the cool crisp air. There was no way pass them, with at least two vendors on every street selling freshly baked Soft Pretzels and gorgeous honey roasted cashews and walnuts I had to stop and buy some every time!

A few years down the line and I still crave those wonderful delicacies. Luckily I stumbled upon an old American recipe book, and when I saw the Pretzel recipe I was adamant to make my own. The only problem was that this recipe contains yeast, and I was not about to wait for dough to rise etc. etc. I wanted my Pretzels now! I adapted the recipe, tried it and it was absolutely delicious......

Follow us on Facebook for more delicious recipes www.fb.com/MakeEatLove


HOMEMADE SOFT PRETZEL RECIPE

2 cups (500ml) All purpose Flour
3 tbsp Unsalted Butter
2 tbsp White Sugar
2 tsp Baking Powder
1/3 (75ml) cup Full Cream Milk (this is Whole Milk if you are in America)
pinch of salt
Coarse Salt or Salt Flakes
1 Egg - beaten

Rub the Unsalted Butter into the Flour until it looks like crumbs. Add Sugar, Baking Powder and Salt and mix together. Add Milk slowly till all the ingredients are wet. Do not add all the milk at once. You have to make sure that the dough is not too sticky, but also not too dry. If you need more milk, you can add another drop. Once the dough is formed you do not have to let it rest, you can work with it straight away.

Divide the dough into smaller balls. Roll out each ball into a long snake. Twist them into shape and put onto prepared baking sheet. Once you have made all your pretzels, brush them with the egg (egg wash) and sprinkle with coarse salt or salt flakes.

Bake in preheated oven 180 degrees Celsius for 10 minutes (depending on size of your pretzels) - they should be nice and golden on the top.

Serve warm. You can serve them as is or with a delicious dipping sauce. Think honey and mustard dipping sauce or even a spicy salsa or nice guacamole sauce.


Now for that roasted nuts..............mmmmmm

Follow us on Facebook www.facebook.com/MakeEatLove.


Enjoy!


29 May 2011

Homemade Peanut Butter Chocolate Chip Ice Cream

This is the easiest Homemade Ice Cream recipe ever! No churning and no machine required!

If you ever thought making your own Ice Cream is impossible or difficult, think again! This is the easiest Homemade Ice Cream recipe ever. I know you may think this Ice Cream cannot possibly be as good as the professional made ones or the good store bought ones, but I can guarantee you that it is just as good if not better and it is o so creamy and o so easy!!

Once you get the basic recipe right, you can really make any flavour of Ice Cream. I really like the Peanut Butter Chocolate Chip Ice Cream because it reminds me of Reeses Peanut Butter Cups...yummy!


Homemade Peanut Butter Chocolate Chip Ice Cream

2 Cups (500ml) Full Cream
1 tin Condensed Milk - you can half this if you want it to be less sweet
4 tbsp Crunchy Peanut Butter
1 cup (250g) Chocolate Chips

Whip the cream till it forms soft peaks. In a seperate bowl mix the Condensed Milk, Crunchy Peanut Butter and Chocolate Chips together. Fold into the Whipped Cream. Pour into container and freeze for at least 6 hours. Take it out of freezer 5 minutes before you serve it.


Now that you have mastered this easy Homemade Peanut Butter and Chocolate Chip Ice Cream, you can try different flavours. I will post some more flavours as I make them. Enjoy!

25 April 2011

Easter Egg Bunnies and Chickens with Chocolate eggs and Fondant

This year I wanted to make some special Easter Eggs for Easter. I decided to make some cute Easter Bunnies and Chickens using White Chocolate Easter Eggs and Fondant. It took me quite a while, but I had so much fun making them.


HOW TO MAKE EASTER EGG BUNNIES AND CHICKENS

You will need white bantam Easter Eggs (the white candy coated chocolate eggs). You can use the bigger ones, but I found that the smaller bantam eggs works really well.

You need fondant in alot of different colours.

You need white and green Royal Icing.

Edible Glue and Colour pens (edible ink).

Marie Biscuits as a base for your eggs.

Green edible food spray (optional)


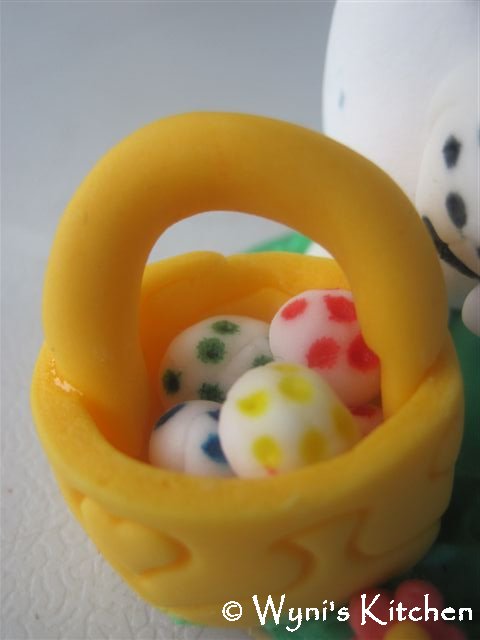
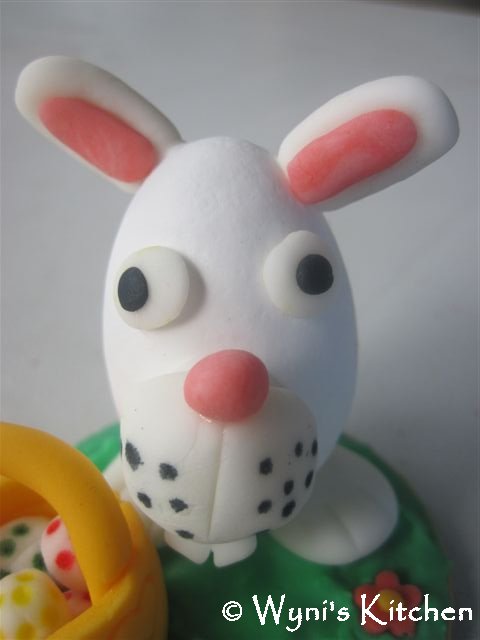
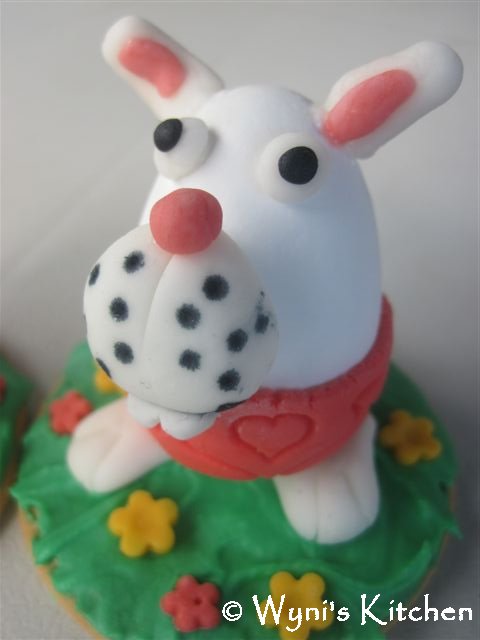
Easter Bunny with Easter Egg basket 

For the Easter Bunny with a basket of Easter Eggs I used white fondant for his muzzle, his eyes, ears, feet and Easter Eggs.
I used a black pen to draw on his muzzle and different coloured pens to draw on the Easter Eggs.
Black fondant for his eyes.
Pink fondant for his nose and ears and little cotton tail.
I stuck his muzzle, feet and ears with some white royal icing and his eyes and nose with edible glue.
I used yellow for the basket  on which I made an imprint.
Red and yellow fondant for the flowers.
The base is a Marie Biscuit covered with green royal icing. 
Basket with Easter Eggs


Easter Bunny


Baby Boy Bunny
For this adorable Baby Boy Bunny I used white fondant for his muzzle, his eyes, ears, feet and Easter Eggs.
I used a black pen to draw on his muzzle and different green and red coloured pens to draw on the Easter Eggs.
Black fondant for his eyes.
Pink fondant for his nose and ears and little cotton tail.
Blue fondant for his outfit which I embossed with a design.
I stuck his muzzle, feet and ears with some white royal icing and his eyes, nose and outfitwith edible glue.
The base is a Marie Biscuit covered in green royal icing.


For the Easter Chicken I used red fondant for his beak and comb. I used white and black fondant for his eyes. I used white fondant for his eggs. I used the coloured pens to draw some dots on the eggs.Yellow fondant for his wings, feet and little heart. The base is a Marie Biscuit covered with white royal icing which I sprayed with green food spray. (you can also just use green royal icing)                                                                 
Chicken Licken


For this cute Litte Girl Bunny I used white fondant for her muzzle, her eyes, ears and feet.  
I used a black pen to draw on her muzzle.
Black fondant for her eyes.
Pink fondant for her nose and ears and little cotton tail. Pink fondant for her little outfit which I embossed with a design.
I stuck her muzzle, feet and ears with some white royal icing and her eyes, nose and outfitwith edible glue.
I used yellow and pink fondant for the flowers.
The base is a Marie Biscuit covered in green royal icing.


Baby Girl Bunnies


For this Little Cottontail I used white fondant for his muzzle, his eyes, ears and feet.  
I used a black pen to draw on his muzzle.
Black fondant for hir eyes.
Pink fondant for his nose and ears and little cotton tail.
I used blue and yellow fondant for the flowers.
The base is a Marie Biscuit that is covered with green royal icing. I also piped some green grass with the royal icing.


For the cute Bunny with large Easter Egg I used white fondant for his head and body, his eyes, ears and feet. I used a black pen to draw on his muzzle.
Black fondant for his eyes.
Pink fondant for his nose, ears, teeth and little cotton tail.
Yellow fondant for his outfit which I embossed with a design and for his bow and flowers on the egg.
Blue fondant for the flowers on the egg.
Red and yellow fondant for the flowers on the grass.
I stuck his muzzle, feet and ears with some white royal icing and his eyes, nose and outfit with edible glue.
The base is a Marie Biscuit covered in green royal icing and I also piped some green grass with royal icing.


Happy Easter and happy creating!


22 April 2011

Cheese and Mouse Cake

I just love baking. I love the whole idea of creating something delicious and homemade, I love the wonderful smell of freshly baked goods that lingers in the air, but most of all I love decorating! I sometimes bake just to decorate! This was one of those times, there was no real occassion apart from celebrating life!
This is what I came up with.....

My Cheese and Mouse Cake


CHEESE AND MOUSE CAKE

Vanilla Cake

2 1/2 cups (625ml) Self Raising Flour
2 cups (500ml) Sugar
4 large Eggs
1 cup (250ml) Milk
1/4 cup (65ml) Vegetable Oil
1 tsp (5ml) Vanilla Essence

Preheat the oven to 180 degrees celcius.
Mix the eggs and sugar together till thick.
Add the flour, milk, oil and vanilla
Beat till smooth and creamy

Bake for 30-40 mins. It is done when a test pin comes out clean.

LET THE CAKE COOL COMPLETELY

Decorate

300ml light yellow butter icing

Fondant - I made my own fondant, but you can also use the bought ones
2 balls (size of my fists) light yellow
1/2 ball dark yellow.
1 ball grey
small piece pink
small piece black
small piece white

I will post a recipe for easy fondant and butter icing soon!

When the cake is completely cool, cut a slice out of the cake then ice the cake with the butter icing.
Roll out the light yellow fondant to 1/2 cm thick and cover the whole cake with the fondant.
Cut circles out of the dark yellow fondant and place all over the cake - to create holes. You can use an edible glue to stick the circles to the cake, but a little water works just as well.
Make some mice out of the grey fondant, add pink to the ears and some black for the nose, eyes, tails and whiskers. Use the white for teeth and eyes.


Fondant Mouse
Baby Fondant Mouse


I used a bit of icing sugar on the light yellow fondant which I covered the cake with to make the cheese look a bit "old and mouldy" - I think this gives it a bit more authentic look - but you can leave it out and make it a bright shiny new cheese!


Have fun baking and creating!


Cheese and Mouse Cake - with fondant


31 March 2011

Easy Cinnamon Rolls Without Yeast

Here is my promised recipe for Quick and Easy Cinnamon Rolls without yeast. Now I know you think that you cannot possibly make Cinnamon Rolls without yeast, but I guarantee you they are just as good as the ones with yeast, if not better and way easier! They are delicious and will definitely be a hit among your family and friends.


EASY CINNAMON ROLLS WITHOUT YEAST


Dough

2 cups (500ml) Self Raising Flour
1/2 tsp Salt
2 tbsp Sugar
1/2 cup (125ml) Melted Butter (unsalted)
2/3 cup (175ml) Milk
1 tbsp Vanilla Essence

Filling

3 tbsp Melted Butter
1/4 cup White Sugar
1/4 cup Brown Sugar
3tbsp Cinnamon

Glaze

1/2 cup (125ml) Icing Sugar
1 tbsp Water

Mix all the ingredients for the dough together and work till it is a nice soft dough ball (not sticky) - use extra flour if needed to get it to the right consistency. Roll dough out on flat surface till it is about 2cm thick and a rectangular shape.
Mix all the ingredients for the filling together and smear it on the rolled out dough. Make sure to cover every part and the corners too.
Roll the dough into a log - take care not to let the filling spill.
Cut the log into 2 cm pieces. Place on a prepared baking sheet (remember the baking paper), place it about 2 cm appart.
Bake for 10-15 minutes in a 200 degree celcius oven till golden brown.

Once they have cooled down you can drizzle them with the glaze.

Make 12 Cinnamon Rolls

You might want to double up...it is that good!

27 March 2011

Quick and Easy Cinnamon Rolls

There is nothing better than delicious, warm, fresh Cinnamon Rolls just out of the oven, and the best part is that you dont have to slave in the kitchen for hours to enjoy these divine Cinnamon Rolls.

They are so quick to make, I have a fresh batch of Cinnamon Rolls ready to enjoy with some coffee on the beach for a weekend breakfast in less than 15 minutes.

Ok, I admit I do cheat a little by buying the bread dough from the local bakery, but I have made my own dough before (with yeast) and it taste just the same. When I do make the Cinnamon Rolls without the yeast again, I will blog it, as it is a bit different, but also very very delicious.


QUICK AND EASY CINNAMON ROLLS

1 kg Bread Dough

Filling

3 tbsp soft Butter
1/2 cup Brown Sugar
3 tbsp grounded Cinnamon
1 tbsp Honey

Glaze

1/2 cup Icing Sugar
1 tbsp Milk

Roll out the bread dough with rolling pin into a rectangular shape of 2cm thick.
Mix all the ingredients for filling together.
Smear the filling on the bread dough.
Roll the bread dough with filling into a log.
Cut the log into pieces 2 cm thick.
Place the buns 2 cm away from each other on a prepared baking sheet and bake for 10 -15 minutes in a 200 degree celcius oven. Put some baking paper on the baking sheet as it will be sticky and messy.
When the rolls are nice and brown you can remove them from the oven and let them cool for 2 minutes before you drizzle them with the glaze.

Makes about 12 Cinnamon Rolls

Tip: You can bake the whole log in the oven and then cut it into slices once it has cooled down and then drizzle with the glaze - as I have done (see picture) the baking time will increase by about 10 minutes if you do bake the whole log.

It is so quick and easy, you will want to have Cinnamon Rolls for breakfast every morning!

28 February 2011

Easy Mojito Recipe


There is nothing as refreshing as a Mojito when the days are hot and steamy.There must be something about the combination of the fresh lime, fresh mint, a hint of sweetness and that tiny tingly bubbles that is totally irresistable to me!

Now don't get discouraged, it is really really easy to make a Mojito.

Here is my Easy Mojito Recipe for everyone who asked and for all you Mojito fans out there!


Mojito
EASY MOJITO RECIPE

1 tot (25ml) or 1oz White Rum
12 Mint leaves
1 large Lime or 2 small limes - cut into wedges
1 tot (25ml) or 1 oz fresh Lime juice
1 tbsp Sugar syrup *
Soda water (Club soda)

In a highball glass muddle Mint leaves, Lime wedges and Sugar syrup together. This will bring out all the flavours.
Add the Rum and fresh Lime juice and muddle all together.
Top off with Soda water.
Garnish with a sprig of mint and some lime slices.


Nothing can be easier. Enjoy!


* You can make your own Easy Sugar Syrup. Put 2 cups of sugar in a jug, then pour 1/2 cup of boiling water over it. Stirr until all the sugar granules has disolved and you are left with a syrup. It can keep in the fridge for a long time and you can use it in all sorts of cocktails. I put mine a squeezy bottle, and it works great!


Sharing is caring!


09 February 2011

How to make your own Amarula Cream


I love a beautiful sunset and probably have a million photos of sunsets that I have taken all over, but the most beautiful sunsets are no doubt the ones in the African bush.
There is nothing better than  to watch a gorgeous sunset while sitting at a watering hole somewhere in the African bush watching the animals and sipping an ice cold Amarula Cream.

 
African Sunset

Kalahari Sunset
Life doesn’t get much sweeter than this!

Except when you can make your own Amarula…


Homemade Amarula Cream

 AMARULA CREAM

1 tbsp coffee
8 shots whiskey
1 can condensed milk
200ml full cream
1 tsp honey

Use good quality coffee. If you are using instant coffee, heat up some of the full cream and add the coffee to it. If you are using grounded coffee, make about 100ml of very very strong coffee. Let it cool. Add the whiskey, condensed milk, full cream and honey and mix well. Pour into a bottle and leave in the fridge for 7 days. Shake it daily.

Makes 1x750ml bottle
You might want to double up as it will go fast!!!


Now if you have never heard of or tasted Amarula Cream, you are definitely missing out. Amarula Cream is a South African liqueur that is made from the exotic Marula fruit. It is a delicious creamy drink that can be enjoyed anywhere!  
The Marula fruit is famed for making elephants a bit “tipsy” as they like to eat the Marula fruit that has fallen off the trees and fermented in the sun.
I don't use the Marula fruit in my Amarula - it's a bit more difficult and I might just have to fight an elephant for enough fruit to make a bottle, but my homemade Amarula is pretty close!

Go ahead and try it - indulge your tastebuds!


02 February 2011

Mango Achar

My friend Hanna has a really cool maid who taught her how to make this amazing Mauritian Achar. This inspired me to try and make some of my own, as the recipe is Mango based and because I still have tons of Mangoes to be creative with.

I did modify the ingredients slightly to suite my taste. The Mautitians love their chilli and put double the amount of chilli in theirs, but I am not quite as brave (yet). If you like yours spicier add more chilli or leave the pips in.


MANGO ACHAR


3 large green mangoes (they must be green and not ripe)
3 green chillies - deseased
6 dried red chillies
2 tbsp sugar
125ml olive oil
50ml lemon juice
2 garlic cloves - grated
1 tbsp mustard seeds
2 tbsp dijon mustard
1 tbsp corriander
1 tsp black pepper
salt to taste

Peel the mangoes and then grate them. Mix the spices, sugar, oil and lemon juice together in a blender till fine. Pour the spice mixture over the grated mangoes and mix well. Put into clean container. You can eat it straight away, but it gets much better when you leave it for a few days.

Makes 1 jar (about 400ml).
Keeps well in the fridge.

This achar is very very good and not oily like the ones you buy in the shop. It has a great fresh taste and goes well with everything. My guine pigs love this one!